Once you’ve stepped into the intricate world of DIY hobbyists, every creation seems like a new adventure! My latest quest was building my very own DIY Solar Flameless Candle. It’s remarkable how you can transform raw materials into something beautiful and functional at the same time. And to top it all, when it’s a green product that harnesses solar energy–the satisfaction is indescribable.
Creating a DIY solar flameless candle is quite straightforward if you have some basic know-how of circuits and soldering. Start with gathering your necessary components like LED lights, photodiodes, resistors, and capacitors, and refine your understanding of circuit diagrams.
Next begins the actual assembly on breadboards followed by etching on PCB (Printed Circuit Boards). A touch of creativity comes in when choosing an attractive container for housing your mechanism before eventually mounting your solar panel for energy absorption.
What To Look Forward To Here:
- An easy-to-understand guide to building a DIY Solar Flameless Candle.
- Handy Tips for perfect placements ensuring maximum harnessing of light.
- A comprehensive understanding of assembling components on breadboards.
- Exciting options for creatively customizing your eco-friendly illumination gadget.
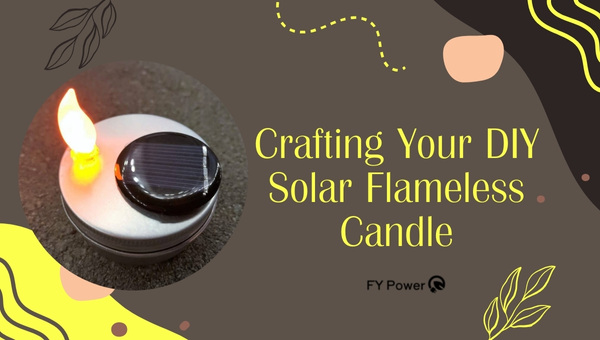
Crafting Your DIY Solar Flameless Candle
Creating a DIY solar flameless candle has never been easier. What a perfect blend of science and craftiness! With just a few common materials, you can concoct this nifty eco-friendly device that illuminates your space while also minimizing your carbon footprint.
Gathering Your Materials
For this project, the components required are minimal and can often be found around the house or easily sourced from local stores. Here is what you need:
- Solar Cell: This is the primary component that harvests solar energy to power our candle. We’ll need a 1-watt, 6-volt mini solar panel.
- LED Candle: Look for flameless LED candles – they mimic real candles but don’t present fire hazards.
- Electronic Components: A set of resistors, capacitors, and transistors specifies the current flowing through our circuit helping control the LED glow.
- Copper Board: To build our circuit on.
- Transformer & Rectifier For charging our battery and converting AC to DC power respectively.
- Battery Holder and Batteries: Batteries store extra energy produced by our solar cell for use when sunlight is not available.
Understanding the Circuit Requirements
What’s most exciting about this DIY project is getting to learn a little about how electrical circuits work!
The foundation of any electronic gadget like our DIY Solar Flameless Candle lies in its circuitry – an endless loop that electrons continuously flow through from different sources (like batteries), passing energy along the way.
Firstly, let’s understand how exactly a solar cell functions. Simply put, it absorbs sunlight converting it into an electric current via a process called photovoltaic effect.
But, we have an additional challenge on our hands. We don’t want our candle to work during the day while it’s charging. It should automatically switch on at night.
To address this, we are going to place a photoresistor in our circuit which responds to changes in light intensity. When there’s plenty of sunlight, our photoresistor will interrupt the power supply for the LED keeping it turned off!
But remember! Safety first – Be mindful of electricity and handle your tools with care when constructing your circuits.
Step-by-Step Creation of Your DIY Solar Flameless Candle
Gather the necessary materials for your DIY solar flameless candle, including a mason jar, a solar-powered LED light, sand or small stones, and decorative items such as ribbons or shells.
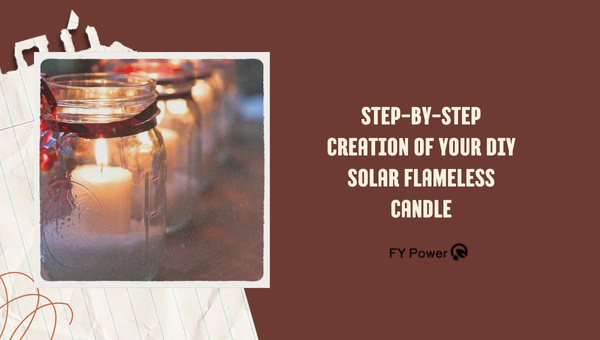
Begin by filling the bottom of the mason jar with sand or small stones to create
Step 1: Deciphering the Circuit Diagram
Creating a DIY solar flameless candle starts with understanding a circuit diagram. This diagram shows how electrical parts are connected. It’s like a map for electronics. Here’s how to read one:
- Look for symbols that represent different parts, such as the solar panel and LED.
- Find lines that connect these parts; they show the path of electricity.
- Notice any marks that tell you how to connect things right, like plus and minus signs for power.
It takes some practice, but once you get it, it’s not too hard.
Also Read: What will a 3000 watt generator run
Step 2: Assembling on Breadboard
Before making anything permanent with soldering, use a breadboard. A breadboard lets you try out your circuit without any final decisions:
- Put in your electronic bits into the holes on the board.
- Follow your circuit diagram carefully.
- Connect wires between these bits to make paths for electricity.
This step lets you test and change things if needed, so take your time here!
Step 3: Preparing and Etching PCB
After testing on a breadboard, it’s time to make it last by creating a printed circuit board (PCB):
- Draw or print your circuit design onto special transfer paper.
- Place this paper onto a blank copper PCB board and apply heat to transfer the ink.
- Use an etching solution to remove unwanted copper and leave only your paths.
It might take some trial and error, but soon you’ll have a solid base for your project.
Step 4: Solder Components Firmly in Place
Now that you have your PCB ready:
- Heat up the soldering iron – not too hot!
- Hold components tight against the PCB where they should go.
- Touch solder wire to the joint area; let it melt and flow around connection points.
Keep things neat for the best results!
Also Read: DIY Solar Lighting Magic: Simple Steps to Brighten Nights
Step 5: Creative Container Selection
Choose something cool to keep your solar candle safe:
- Glass jars can show off internal workings; nice touch!
- Tin cans give an industrial vibe plus they’re sturdy.
- Ceramic pots? Why not! They add an artsy look while protecting components inside.
Have fun picking out just the right one!
Step 6 — Mounting the Solar Panel Correctly
Putting up the solar panel matters for enough sun power:
- Position on top or side where sunlight hits well during day hours.
- Attach securely but gently – strong adhesives or even Velcro works well!
Without proper positioning or attachment, no power means no light from our candle at night!
Step 7 — Completing & Ensuring Functionality
Final touches time:
- Check all joints – are they firm?
- Enclosure – is everything fitting snug in a chosen container?
- Weatherproof? If going outside, seal up against water entry spots.
Making Most of Your Homemade Eco-Friendly Light
Creating a homemade eco-friendly light not only helps reduce energy consumption but also promotes a sustainable lifestyle. By utilizing recycled materials and efficient lighting technology, you can maximize the benefits of your homemade light, contributing towards a greener environment and lower electricity bills.
When it’s all done and your DIY solar flameless candle is glowing, it’s key to put it in the right spot. Finding that sweet spot takes a bit of thinking because you want to grab as much sun juice as possible during the day, and then when night comes, you want that light shining bright where you need it.
Best Placement Practices
Alright, let me break down some golden rules for placing these cool eco-friendly lights:
- Sunbathing Spot: First thing’s super clear, your little solar buddy needs sun – loads of it. Look around your space to find a place that gets lots of sunshine all through the day. This might be on a windowsill, an open balcony or a patio where trees or buildings aren’t throwing shade too much.
- Avoiding Hiding Spots: Keep them away from spots where they can slip into shadows easily – like under roof overhangs or shaded corners. Shadows might sneak up as the sun moves across the sky, so make sure there’s no sneaky shade going to cover them at peak times.
- High Ground Wins: If you can, prop them up higher rather than lower down on the ground – kind of like flagging down a taxi with your candle making sure the sun sees it and stops by with some charge.
- Shiny Surfaces: Reflective surfaces are buddies with light. Putting candles near things that bounce light back—like mirrors or shiny metal—can double up on that glow when dusk hits.
- Safety First: Now thinking about inside spaces – always put them where they won’t trip someone up and far from anything that loves catching fire (talking curtains and such). Safety isn’t just first, it’s everything!
- Center Stage: Watch out for how your room is laid out if placing these candles inside plonking one right in the center can send warm vibes all around; tucked away in a corner could be wasting its cool look.
- Weather Check: For outdoor settings, think about whether tantrums like wind blowing hard or rain pouring sideways; find spots that give some shelter but not full-on hideouts from sunlight (you get what I mean).
And hey! Just because I’ve said all this doesn’t mean you shouldn’t experiment – play around with spots till your heart’s content and get creative! With every new place tested, you’ll figure out more about how much sparkle you’re going to get out of these beauties.
There you go – keep these tips in mind when setting up and soon enough your place will be looking cozy without guzzling all sorts of power or flicking flames – now isn’t that something?
Also Read: DIY Solar Charger: Create 12V Battery Power in 5 Steps
FAQs
How do solar candles work?
Solar candles use a small solar panel to charge during the day. When it gets dark, they automatically switch on, giving off light without an open flame.
What are flameless candles made of?
Flameless candles are typically made from wax or plastic and include LED lights to mimic the glow of a real candle.
Conclusion
After going through each of these meticulous steps, I’ve created my very own DIY Solar Flameless Candle. It wasn’t just fun, but it’s also a wonderful way to bring in more sustainable practices into my daily life. The glow from the candle is not only safe and flameless but is powered by the abundant energy of the sun which makes it cost-effective and eco-friendly.
Key Takeaways for Crafting a DIY Solar Flameless Candle:
- Start with gathering all necessary materials and understanding their roles.
- Learn about solar-powered circuits to create an efficient energy solution.
- Follow the detailed step-by-step guide from circuit design to final assembly.
- Choose a creative container that adds to your decor while housing the mechanism.
- Place your solar candle strategically to maximize both daylight solar intake and nighttime illumination.